Tuesday, December 27, 2011

Laundry Detergent, 6 gallons for under $3.

I love the new Tide slogan "Style is an option, clean isn't". Or something like that. So to keep your style clean I have worked out a recipe for a great laundry detergent that will be safe to use and easy on the wallet. You will only need three ingredients Washing Crystals, Borax, and Fels-Naptha. All three of these are available at my local grocery store in the laundry isle. 
Six gallons of laundry detergent for this? Yes, please. 

Have all of these ingredients and tools handy:
One 5-1/2 oz. Bar Fels-Naptha Laundry Soap
1-1/2 Cup Borax
1-1/2 Cup Washing Crystals
1 Stock Pot
1 Funnel
6 Empty gallon jugs
1 Box grater

The first step is the hardest! Grate one bar of Fels-Naptha Laundry Soap. This will make about 2 Cups and costs around $1.29 at the local grocery store.

Now that the grating is done place the soap flakes in a stock pot with 1-1/2 Cup Borax ($0.68 locally), 1-1/2 Cup Washing Crystals ($0.82 locally), and 12 Cups of water.  Stir and heat over medium on the stove. 
Looks a little egg-y.

While this is warming up be sure to stir often. Time to start filling those six gallon containers with 12 Cups of water in each. I usually fill one and use it as a measuring stick for the rest. Mark the water level for when you re-use these. 

Once all your soap has dissolved on the stove and has a nice foam to it, take it off the heat. 

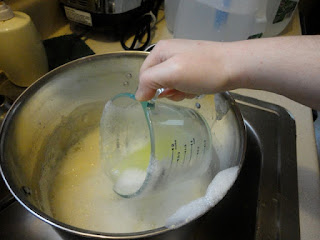
Place 2 Cups of the soap concentrate in each gallon jug. Use the funnel and a heat safe glass measuring cup. 


Use a bamboo skewer to stir up the concentrate and water, or close the cap and shake gently. Top off the jug with about 2 more cups of water. 


Sunday, October 2, 2011

Toasted Quinoa Salad with Roasted Garbanzo Beans


So, until recently I was unaware of an amazing ‘super food’ called quinoa. First I want to spare anyone else the embarrassment of mispronouncing this goodness of nature. When you are at the grocery store and need direction please, please, please don’t asked for “Quinn-oha” say it “Keen-wa”. As someone who had only seen the word in print I made the mistake of uttering the first pronunciation. On a side note most grocery stores keep quinoa in the gluten free or grain section of their natural selections aisle. 
What is the food that I regard so highly? I would describe it as having a nutty flavor and an orzo like texture. Like rice it has such a versatile place in recipes. Sweet, spicy, and salty can be achieved in this miracle food. One thing I really like about it is it can make an endless amount of different one-bowl meals. Who doesn’t love a dinner that doesn’t require an entire load of dishes?
You probably now want to know why it is so good for you. It is a rare food that it a complete amino acid making it a complete protein that is essential to the human diet and rare in a plant based diet. As I mentioned before quinoa is found in the gluten free section of the grocery store because it is and always will be gluten free. Quinoa is also one of the most vitamin rich foods I have ever seen. As a plant food it also lacks cholesterol as long as you don’t add any animal product in the preparation (duh!). People have claimed it helps reduce risks and effects of diabetes, heart disease, migraine headaches, and cancer. 
I bet you are all waiting for a recipe now so you can cure what ails you. This one is so easy and makes plenty of left overs!

Toasted Quinoa Salad with Roasted Garbanzo Beans

1-12 oz. Box of Quinoa 
2 cups water
1-15 oz. Can of Garbanzo Beans (aka Chick peas) drained and rinsed
2-3 Roma tomatoes seeded and diced
1-12 oz. Bag of frozen Corn kernels thawed
1 medium red onion diced
Olive Oil as needed
4 Tbs. Italian seasoning
Salt and pepper
Dressing
½ cup lemon juice
4 Tbs. Olive Oil
4 cloves of garlic finely minced
2 Tbs. Italian seasoning
1 Tbs. Fresh cracked Black Pepper
Fresh Basil for garnish (optional)
Heat about 2 tbs. Olive oil in a cast iron skillet over medium heat for the quinoa and preheat the oven to 350° for the Garbanzo beans.
Rinse the quinoa in a fine mesh strainer to removed any debris, like you would rice. Shake the strainer to remove excess water. Place the rinsed quinoa in the warm skillet and use a spatula to make an even layer. Stir  occasionally to prevent burning for about 5 to 8 minutes or until a few are brown.
Another great use for my cast iron! See link below to get one for yourself. 

       Add 2 cups of water to the toasted quinoa in the skillet and raise the heat to high. Allow all the water to absorb or evaporate out and remove from heat. Take off stove and allow to cool.
This is what it will look like after cooking. Each grain should be swollen and a few 'squiggles'.

While the water is evaporating drain and rinse the canned Garbanzo beans. Place them on a baking sheet and coat them with 4 Tbs. Italian seasoning, salt, pepper and olive oil. Place in the preheated oven for about 10 to 15 minutes or until a nice, rich brown color. Remove for the oven and allow to cool. 
Nice and brown roasted Garbanzo beans. 

After removing the quinoa and beans from the heat dice the vegetables and make the dressing. For the dressing warm 4 Tbs. Olive oil in a shallow pan and add ½ cup lemon juice. Add the garlic, Italian seasoning, and black pepper. Saute until garlic begins to brown. 
Combine cooled quinoa, beans, and veggies in a large serving, mixing, or storage bowl (my favorite is all three! see link). I recommend using a rubber or silicone spatula to give a gentle touch. Pour the lemon dressing over the top and stir until combined. Fluff with a fork and add a little basil garnish before serving. Great served hot or cold, I actually prefer it cold. 


So easy and fast! My husband and I usually can get two dinner servings and about 3 or 4 lunch servings out of this recipe. It’s a real time and money saver. I usually make some sort of quinoa salad on Sundays to ensure we have something for lunches early in the work week.

Special thanks to Very Culinary for getting me hooked! Here is a link to the recipe that inspired me. http://veryculinary.com/2011/08/09/toasted-quinoa-salad-with-cumin-lime-dressing/
So good even Chief wanted a bite. Served in a roasted poblano pepper.


A few helpful links from Amazon:


Saturday, September 17, 2011

Fall Accessories Wish List

Here are a few things I am keeping in mind for accessories this fall. It would be a cold day you-know-where before I spent $100 on a wallet, but it sure did inspire me. The feel this fall is for natural, boho seventies. So fun and easy! 

Source: endless.com via Alice on Pinterest

Source: endless.com via Alice on Pinterest

Source: endless.com via Alice on Pinterest

Source: endless.com via Alice on Pinterest

Source: endless.com via Alice on Pinterest

Source: endless.com via Alice on Pinterest

Source: endless.com via Alice on Pinterest

Source: endless.com via Alice on Pinterest

Source: endless.com via Alice on Pinterest

Source: endless.com via Alice on Pinterest

Source: endless.com via Alice on Pinterest

Source: endless.com via Alice on Pinterest

Source: endless.com via Alice on Pinterest

Source: endless.com via Alice on Pinterest

Tuesday, September 13, 2011

Sunday, September 11, 2011

DIY Granola Bars

In my quest to eat better and remove processed food from my diet I have had to get creative. One thing I ate nearly constantly was Nature's Valley Granola Bars. There is nothing really terrible about them except their long ingredient list. (Check it out here:Nature Valley Crunchy Granola Bars) I figured it was an easy place to start and I could make some of my own variations. The recipe I have included can be changed up as you please. Happy Baking!


DIY Granola as You Please


1 Cup Old Fashion Oats (not quick cooking)
½ Cup Sliced Almonds
¼ Cup Unsalted and Shelled Sunflower Seeds
1 Cup Shredded an Unsweetened Coconut Flakes (loosely packed)
½ Cup Toasted Wheat Germ
1 Cup Puffed Rice Cereal (can be cocoa-ed)
½ Cup Raisins
⅔ Cup Dark Pure Maple Syrup (or 1/3 Cup Honey and 1/3 Cup Molasses)
3 Tablespoons Unsalted Butter (or substitute)
¼ Light Brown Sugar
1 teaspoon Pure Vanilla Extract
1/8 teaspoon Sea Salt
Parchment Paper

Preheat your oven to 350°. Line a baking sheet with parchment paper. I always use parchment when toasting nuts and oats to keep the flavor in the mix and not on the pan. Toss together the oats, almonds, sunflower seeds, and coconut flakes. Trim down the parchment paper to the edge of the baking sheet to prevent burning. Place these in the oven for 8 to 10 minutes stir occasionally to keep from burning. 

While the baking sheet is in the oven place the maple syrup, butter, vanilla, brown sugar, and salt in a sauce pan and warm over medium-low heat. Stir to prevent burning to the bottom. 

Pour the wheat germ, cereal, and raisins in a large mixing bowl.  Add the oat mixture from the oven and the syrup mixture from the stove to the mixing bowl. Stir quickly and gently with a rubber or silicone spatula. This gets sticky as it cools (like Rice Crispy Treats) so work quick!

Transfer to a parchment paper lined 13 x9 cake pan, trim paper down. and bake at 350° for 25 minutes. Cool completely and eat!


Monday, September 5, 2011

My Food Revolution and Yours Too.


Hello Readers!,
I want to apologize for my absence. My mind has been flooded with the idea of “eating to prevent and cure”. It sounds insane but many doctors and scientists have found which foods help us and which ones hurt us. The idea is if you have something wrong with you eat certain foods and avoid certain foods. When you are healthy avoid foods that in the long term make you sick. Crazy talk!
Sounds simple? In a way it is, but when you have to sort out what some of your health goals. For myself I wanted to lessen my allergies (I was tired of prescription side affects), stop having acne breakouts (I have tried literally every product on the market!), and lose those pesky muffin top pounds (duh). Luckily, my problems all fell into some of the same food categories. I can honestly say when I stick to what I have learned my face is clear (inside and out) and my weight is much less of a beast. 
I started my food journey earlier this year and this past month I have really learned about how vast this idea spread. I started with an Anti-Inflammation “diet”. I use “diet” loosely as it conjures up terrible images. The basics are no white flour, refined sugar, or processed foods. (Many other rules that are different for everyone also came into play.) Difficult. These new rules where tough to live by, but once the ball was rolling and I could breathe, skip concealer, and sit with my pants buttoned all at the same time I became a believer. 
What you put into your body affects it and the more you are aware of the make up of your food the healthier you will be. This started my interest in what is being dubbed the “Food Revolution”. An entire movement of people have shed light on the food industry. WARNING: You cannot unlearn what you will learn if you watch and read he material I suggest. 
Food has somehow become political. People don’t want to tell you what or how your food gets to your plate (or eeek Styrofoam box). Sadly, most people don’t want to know. If you are like me and want to live without illness, prescriptions, and pesky pounds come to the revolution! If you are prepared to learn I have suggested some documentaries below. Extracurricular research is highly recommended and encouraged. I am by no means an expert, but I recommend learning for yourself and your friends and family. 
Click on any of the pictures below for more information. 
Food Inc. 
Possibly the most common of the food documentaries out there right now. PBS airs it every now and then. This one focuses on Industrial farming and where you food has been before it gets to your plate. Also, it has quite a bit of info on how the government allows companies to patent soy beans and other naturally occurring foods by simply engineering their genes. Creepy. 

Forks Over Knives
This documentary focus on a plant based diet and its health benefits. Doctors who have done long term studies on the benefits of veganism are interviewed. They compare our cultures obsession with dairy against eastern cultures lack there of. 
Fat, Sick, and Nearly Dead
This one was so inspirational! It is the story of one man trying to cure his mysterious illness, which (shocker!) is cured by a dietary change. Along the way he meets another man with the same illness and transforms that mans life, who in turn transforms the lives of all the people in his town. In a final story twist he saves his own brother after a heart attack. Hollywood could not have written such a touching story. Tears, literally tears of joy for these people. 

Foodmatters
This is the best one if you have any illness. It is very to the point about foods that can save your life and even reverse illness. 

I highly recommend all of these. Don't worry about making all of these changes at once, it takes time to not want to murder some one over a DQ Blizzard, pepperoni pizza, or Diet Coke. Trust me. Any knowledge and changes you can make now are for the better. I hope this helped you! 
Love Alice


Sunday, August 7, 2011

Whole Wheat Blueberry Pancakes (with vegan opt.)

Good morning blogees! I woke up this morning with the urge for pancakes, so I thought I would share...

As always I decided to get creative with 'healthify-ing' what could be a really bad junk food feast. I swapped out the all-purpose flour for the whole wheat variety and changed out all the dairy items. Blueberries are such a great antioxidant and add sweetness, this will help me not drench my stack in syrup. To each there own, I won't be mad if you want a more traditional flapjack.

Start a pot of coffee and warm up your griddle! It's pancake time!
Print Friendly and PDFPrintPrint Friendly and PDFPDF

  • 1 1/2 cups whole wheat flour
  • 3 tablespoons sugar (turbinado for the vegans)
  • 1 tablespoon baking powder
  • 1/4 teaspoon salt
  • 1/8 teaspoon ground cinnamon 
  • 2 large eggs, at room temperature (1/2 C silken tofu)
  • 1 1/4 cups milk, at room temperature (almond milk)
  • 1/2 teaspoon pure vanilla extract
  • 3 tablespoons unsalted butter (Earth Balance)
  • 1 Cup Fresh Blueberries


In a large bowl, whisk together the flour, sugar, baking powder, salt, and cinnamon.
In another bowl, beat the eggs (tofu) and then whisk in the milk and vanilla.
Melt the butter in a sauce over medium heat.
Whisk the butter into the milk mixture. Add the wet ingredients to the flour mixture, and whisk until a thick batter is just formed. Carefully fold in the blueberries with a rubber spatula.
Plop them on your hot griddle and flip them when the bubbles stop popping up. 


Sunday, July 24, 2011

Farmers Market Marinara Recipe.

If you read my previous post My Super Labor Intensive Marinara Win you know about my first attempt to satisfy my craving for home made pasta sauce. I spent some time this week studying up on how to make this time consuming idea a little easier. The fact of the matter is a good fresh marinara sauce takes time, there are not really any shortcuts. I have in the past used the recipe Marinara Sauce by Ina Garten on FoodNetwork.com with canned tomatoes. It is really simple, quick, and tasty when good tomatoes are hard to find. If you are pressed for time I highly recommend it.
Now knowing (or thinking I know) how to stream line the process of making sauce I spent Saturday at the farmers market in search of ingredients. For a moment now I must climb up on my soap box and talk about the importance of shopping at your local farmers market. The money you spend there will go directly back into your community, there is no corporate headquarters getting a cut elsewhere. Also, less travel time equals less carbon footprint. While you are purchasing you also have a great opportunity to ask if what you are buying contains any GMOs or pesticides. That is all the preaching I will subject you dear readers to this time.

Check out my last post on Garlic Wheat Bread to add to the plate.

Here is the recipe and don't forget to visit your local farmers market!

Print Friendly and PDFPrintPrint Friendly and PDFPDF

Farmers Market Marinara
6 Large Tomatoes
1 Medium Yellow Onion
1 Regular Head of Garlic (½ Head Jumbo)
6 Fresh Basil Leaves + more for garnish
1 tsp. Kosher Salt or Coarse Sea Salt
1 ½ tsp. Fine Sea Salt
1 and ½ tsp. Fresh Ground Black Pepper Divided
½ C Red Wine (I recommend Chianti, see if you have a local winery) 
4 Tbs. Extra Virgin Olive Oil Divided
2 Tbs. Balsamic Vinegar 
Parchment Paper
Baking Sheet
Stock Pot or Dutch Oven
Large Spoon and Laddle
Mixing Bowl
Spatula
Paring Knife
Chopping Knife
Cutting Board
Fork
Preheat oven to 400ยบ F
Slice and remove seeds from tomatoes. Place in mixing bowl with 2 Tbs. extra virgin olive oil and 2 Tbs. vinegar. Sprinkle the kosher salt and 1 tsp. ground black pepper over tomatoes. Gently mix with a spatula until all the tomatoes have a little flavor on them. 


Line a baking sheet with parchment paper and layout all the tomatoes. Try to get as many tomatoes as possible with the flesh down and skin up. Trim away all the excess paper to avoid smoking. Bake for about 10-15 minutes or until the skin starts to pull away from the flesh. They should look a bit wrinkled. 
Before Cooking

After Cooking

While the tomatoes are in the oven chop the garlic and onions very finely. Place the stock pot over medium heat with 1 Tbs. olive oil and let the garlic, onions, sea salt, and  ½ tsp. ground black pepper ‘sweat out’. Once the garlic and onions become translucent pour in the ½ cup red wine and simmer until the wine becomes syrupy. 
Once the tomatoes come out of the oven use a fork to pull the skin off. Place the remaining flesh in the pot with the wine. Now chop and stir in the 6 basil leaves. Cook on medium until the tomatoes start to fall apart, this should take about 30-45 minutes. Stir about every 10 minutes to avoid burning at the bottom. Turn the heat down to medium-low and simmer until the desired thickness. For a chunky and runny sauce leave on for about an hour, for a thick smooth sauce about two hours. Continue to stir about every 15 minutes to keep the consistency even. Add a little more basil before serving and add a leaf or two to the finished plate. 

If you make this in advance and plan on reheating it I highly recommend warming it in a sauce pan with a little more seasoning and not a microwave. The microwave tends to zap some flavor. 
This recipe makes about 2 of these jars.